Now it’s time to discuss another approach for creating more realistic-sounding orchestral productions using sample libraries: Layering Samples. By “layering” I am referring to using multiple samples at the same time to achieve a certain sound. What’s important to first understand is the WHY? Why would would you want to do this? With so many high quality, full-featured orchestral sample libraries to choose from, certainly there is one that cover all our needs? When I first started to make my own orchestral music with sample libraries, I would hear people talking about layering their samples, but, I never really understood how or why they did it; so, over time, I’ve developed my own way of determining the best uses of this technique and I usually find that my choices are driven by three main situations:
- To mange the sound’s color, texture or fullness: Layering Samples to create a specific sound – often used for creating more realism and/or a more fuller, richer sound.
- To manage the detail and focus of an instrument : Layering Samples to increase the detail of an instrument group, including supporting a specific articulation and/or manage the mix depth (front-to-back.)
- To create an original sound: Layering Samples to create a completely new and unique sound.
Considerations when layering samples
Before we get started, let’s remember that we are layering for the purpose of achieving a specific sound. Therefore, what I describe here, and how I use these categories and terminology, is certainly not black and white and should not be seen as a “rule”. I am separating out these concepts as a starting point and as a way to explain the “why” and “how” of layering orchestral samples.
This is particularly important to remember when we discuss the layering of articulations. Using the right articulation for the right sound (at the right time), is a separate topic altogether and I cover that in my post here. What we are learning in this discussion, is how to layer articulations to create a specific sound that we cannot achieve by using a single sample “out of the box.”
What about mixing room sounds?
One of the main challenges of layering samples is managing the reverb for samples that were recorded in different rooms. As I discuss in my previous post on wet vs dry libraries, sample libraries will usually record orchestras in large halls where the “sound” of the room (reverb) is included in the sample. This is an awesome feature if you are using samples from the same library (i.e. recorded in the same room) as you are truly hearing the sound of the orchestra inside a real room.
But, what if you want to layer a string section that was recorded in Air Studios with a string sections from a library that was recorded at the MGM Scoring Scoring Stage? Now, we’ve created a sound where part of the orchestra is in one room and the other part is in another room! While this immediately raises questions of authenticity, the other big problem, of course, is that the reverbs of the two separate rooms can often blur together and make the overall sound muddy and lacking a sense of a real space.
Because there are so many potential combinations of sample libraries and room sounds, it’s not possible to say that this will always be an issue: Maybe we WANT the sound that is produced by such a combination? Or, maybe, the combo doesn’t produce any noticeable issues….we can’t know for sure until we try. However, generally speaking, the immediate remedy for this is to reduce the room sound for each sample library. The goal is to get each as dry as possible — no reverb. This is usually done by turning down the room mics and turning up the close mics (if the library offers this functionality.) Once we have a dry sound coming from both libraries, we can then add our own reverb to both, which will now put them together in the same room. Magic! I will discuss reverbs in a future lesson, but, for this technique we usually want to choose a convolution reverb, such as EW Spaces, or AltiVerb, as these types of reverbs emulate the sound of an actual room vs an algorithmic reverb, such as Lexicon or ValhallaRoom.
 |
+ |  |
But won’t there be too many players now?
Another common issue that comes up when layering samples, is the size of the orchestra that is created whenever we layer samples. If sample library A has a 40-piece string section, and we layer it with sample library B’s 60-piece string section, now we have 100 string players in our orchestra! Is that realistic? Do we care? This is where “creative license” comes in!
Of course, the sound of 100 players will be larger than 40 players, but, in the context of an orchestral production, we might just hear it as a “fuller” sound. Meaning, after everything is mixed together with other instruments and effects the listener of our final production will not be counting the number of string players they are hearing. Instead, they will simply experience the sound of a full, impressive orchestra. It’s also important to remember that when layering samples in this way, we need to manage the volume of each. Often, the supporting sample is lower in the mix, and therefore, not dominating the overall sound.
Above everything, remember the type of music we are producing. Consider the differences between a recording of a Bach concerto vs a Hans Zimmer score for Batman. The Zimmer sound is very produced and rich with sounds that don’t even exist in a traditional orchestra (or even in this world at all!) When we have heavily produced pieces like Hans creates, we actually need to spend more time ensuing that the orchestral elements are full and able to “cut through” those kinds of dense and dynamic mixes.
Meanwhile, If you are want to create traditional classical pieces, where realism is paramount, then, you might not want or need to layer samples at all. So, in many ways, the need to layer samples often is driven by the style of music we are creating. That said, even traditional pieces can use some “layering help” as we discuss those techniques now below….
1. SITUATION ONE: Layering Samples for Color, Texture and/or Fullness
What helps contribute to the realism of a sampled orchestra?
Believe it or not, one of the reasons we love the sound of a live orchestra is because of the unique sound that is created when many individual performers are all playing at once. It’s this magical blend of so many different performers that makes the sound of an orchestra so unique. I spent most of my career playing in small ensembles (indie, rock, jazz, acoustic, etc) as well as composing in my perfect “digital” world of keyboards, MIDI, quantization and pitch correction tools.
What I missed, and what I needed to learn to appreciate, was that an orchestra’s amazing sound comes from all the slight imperfections of each note as it’s being played. For example, if you have 8 violin players who all play a “C” note at the same time, chances are, each one will be just slightly off in terms of intonation, timing, expression or attack. (And don’t forget: violins don’t have frets!) When they all play together, these very slight variances are what create the full sound of an orchestra. The sound of pure perfection, is what we get from our MIDI programmed orchestras – but, this is also what makes those perfect world sound less realistic. We actually want to hear the imperfections as that is what makes it sound more real.
One way to help with the realism, is to layer samples from different libraries. Why does this work? Because, libraries recorded with different musicians, using different instruments, in different studios, with different microphones and room sounds (you get the idea) will mean that we are introducing more variances (potential imperfections) into the sound. For example, imagine a Long “D” note sampled from Library A. When this note was recorded, there was likely a lot of focus on making sure all the players were in-sync and as close to perfect as possible. Meanwhile, Library B, working on the opposite side of the world, with different musicians, creates their own Long”D” Note for their library. And they too, strive to make it perfect for the context of this single sample library. But, the chances of these 2 separate Long notes perfectly matching each other, is very slim! Maybe one team starts the note a 100 milliseconds before the other group? THIS is what creates imperfection. So, by combining both sample performances, we can introduce the effect created by less-than-perfect performances, which, as we discussed above, helps to make our sampled orchestras sound more realistic.
Example: Laying samples for a fuller sound
This might be the most standard response to why we layer samples, and is really another result of what I just described above. Anyone who has been recording music for any period of time, knows that one of the best techniques for creating a stronger, fuller sound on any instrument (or voice) is to layer it. The history of recorded music is full of layered guitars, layered vocals, etc. When we want an instrument to really sound big and full, we often double-record it. It might be the exact same words that are sung, and the same guitar pattern that is strummed; but, because it was done as 2 separate performances they won’t be 100% perfect and identical. As discussed above, those imperfections of each performance are what create this new and fuller sound.
We all have a voice
Because not all of us have had the experience of playing in an orchestra, it can sometimes be difficult to appreciate the sound that such a large group of performers can produce. So, another way to think of all this, is to imagine a choir. What is the difference in sound between a 50-person choir and a single soloist? This is a ridiculous question, as we all know how different these two examples will sound. The soloist would be a much smaller sound, but, it would also be a clearer communication as we’d be able to hear every nuance of their voice. Because we all have voices and know what a single person sounds like when they sing or speak, we have an immediate reference point to know that adding 49 more voices will sound different. The large choir sound is much bigger, but it also has less clarity and detail and it is harder to hear every word clearly. The choir sound is more about the “experience” that this group of singers can make. A string section is no different. As a composer, we need to decide: are we trying to create a big, full sound with less detail, or, are we after a smaller, intimate sound with more clarity?
What does this have to do with sample libraries?
So, bringing this back to orchestral sample libraries, if I need a string section to cut through a mix, or have a stronger melodic statement, I will often layer those parts with samples from another library. Often, the notes that are played are identical (although, even better if they are performed separately), but, because they are played on different strings (different string libraries), they will not sound perfect, and that is what helps create the fuller sound. Without going into a long discussion about every single orchestral sample library available, one thing we can say for sure: They each have their “own” sound:
- As I explain in my previous post, some are recorded wet(Spitfire’s Albion One) and some are recorded dry (LA Scoring Strings) (see below for example of how/why to layer these two specifically)
- Some use smaller groups of performers (Spitfire Chambers Strings) while others are enormous (8dio’s Majestica)
- Some libraries have a very “hot” upfront sound (eg Metropolis Ark 1), where others have softer attack and are more lush (Spitfire’s Albion One)
When you have the time, try to find free audio examples of these libraries online and listen to them side-by-side. This is when you will really hear the difference and will appreciate how blending two complementing samples could have a significant impact on the sound. The smaller, intimate sound of Spitfire Chamber strings, will give you a smaller sound, but it will provide more detail as you will be able to “hear” each instrument a better than a large 240 person orchestra like 8dio’s Majestica. The sound of Majestica will sound huge, like a Hollywood Blockbuster movie soundtrack; however, it will also provide less detail as all the instruments start to blend together to create that huge sound. So, it becomes the challenge of the composer to find the right balance between these extremes. Use Majestica when we need that enormous Hollywood sound, but, maybe layer Spitfire Chambers Strings to help provide more clarity and detail.
Example: Layering samples to add texture and size (eg to help a sound cut through a dense mix like Epic music)
Spitfire’s Albion One is a beautiful-sounding library; it is one that I use constantly, particularly for sketches and for the base ensemble of a string section. It has what I describe as a regal and round sound with a “feathery” attack. It’s perfect for many styles of music. However, I find that for more “epic” pieces, where I really need the strings to cut through a dense mix, Albion can sometimes sound too soft and not “big” enough. This is a perfect of example of when I might reach for another library to layer over it and provide some added “girth” and punch to the sound.
Choosing the library to layer is a creative choice and often I will try several different libraries before I find one that just “works.” One initial approach is to consider using a library that has a sound that compliments the other. For the libraries I have in my arsenal, I would view Metropolis Ark 1 as a good compliment to Albion One.
The strings in Metropolis Ark 1 have a very “hot” and upfront sound to me. To my ears, it sounds like they have a lot of compression baked into the samples which adds a rich, colorful texture and allows them to punch out of the mix with a force! To be honest, I don’t really love the sound of Metropolis Ark 1 by itself. That hyper-epic sound can be too much on it’s own. However, it’s a great library for layering under a less punchy sound like Albion One. I usually blend it in very low, but even then, the Metropolis Ark 1 strings can add an interesting color and texture as well as give a a sense of force and urgency to the sound.
Example: Layering samples to create movement for a sustain
The long sustains that come out of our sample libraries can sometimes be too perfect! They linger on and on for as long as we keep our fingers on the keyboard! Sometimes, in these situations, it can be interesting to layer-in an articulation with some movement in it, to help break-up the straight sustain and to add texture and realism to the performance. Vibrato is the way a string player would do this naturally, and, we already have vibrato, modulation, expression and other parameters available to control via MIDI. For a more dramatic effect, try mixing in a soft tremolo articulation under the sustain note.
Be careful! This needs to be subtle, or the tremolo will quickly take over. While I don’t use this technique too often, I do find that when used sparingly, it can introduce a very cool effect that is more dramatic and “raw-sounding” than what vibrato can achieve. If you own libraries like the The Evolutions from Spitfire, Time Macro from Orchestral Tools, or Novo from Heavyocity, these have a plethora of “motion” patches to use for layering in this matter, and are far more customizable and generally easier to integrate verses a basic tremolo articulation. However, these libraries are not cheap! So, I wanted to included an option of using an articulation you likely already have in your current sample library.
Example: Layering samples to add richness and character to a softer passage
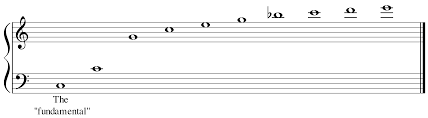
We’ve been talking a lot about epic sounds so far, and trying to make the orchestra bigger and “cut through” the mix. But, layering can also help with softer, more intimate performances as well. One nice treatment for this type of music is to layer a harmonic articulation, one octave above the sustain notes. As I discuss in my post on string articulations, harmonics articulation only includes the overtone of a note – no fundamental. So, by itself, it is very thin (and high-pitched!) But, this is perfect for softer, less-dense music, where we don’t want to beef-up the strings, we just want to add some color and additional sparkle.
The harmonics articulation will play the same notes as the main sustain articulation, however, it adds-in those higher frequencies that we don’t always get to hear, and does it without doubling the fundamental (doubling the original notes.) While this is not the perfect analogy, if you’ve ever used distortion to bring richness or sparkle to a sound, this is doing a similar thing. Distortion produces overtones to the original notes and that is what is creating the added color and texture.
The harmonic notes above the fundamental:
2. SITUATION TWO: Layering Samples for Detail, Focus or to Control Mix Depth
Example: Layering Samples to achieve the right Attack
One of the best examples of layering samples for detail and clarity, and something I use all the time, is layering a short, up-close articulation in order to achieve the right level of attack. By “up close” I am referring to a sample with little to no room sound (close mics only.) My favorite library for this utility is LA Scoring Strings. It’s the most dry, up-close library I own. The samples sound like the microphone is sitting right on the strings! Because it contains no room sound what-so-ever, I find that I can layer the shorts of LA Scoring Strings into literally ANY other string library and it will help strengthen the attack and push the overall sound through the mix. This is most helpful when we need to have the down beat (attack) of note cut through a dense mix, such as an action-type piece, however, I find I use this technique in slower, less-dense pieces as well. Having the ability to introduce the raw sound coming off the strings, is so helpful in crafting a more realistic sound.
While I rarely use this technique with longer notes, it’s technically possible to do so for the same reason. A longer note will have a “softer” attack; which, by itself, is fine and often what you want. However, again, if the production is full of other instruments (guitars, drums, synths, etc), that “softer” long note can get lost.
By layering a short sample articulation (eg a marcato or staccato might be best), and mixing it so that it’s not too loud and obviously separate from the long note, we can get just a little more attack on each note, which can help the notes cut through the mix. Give this a try, but just be careful not to have the short notes poke out too much as it will likely sound unnatural.
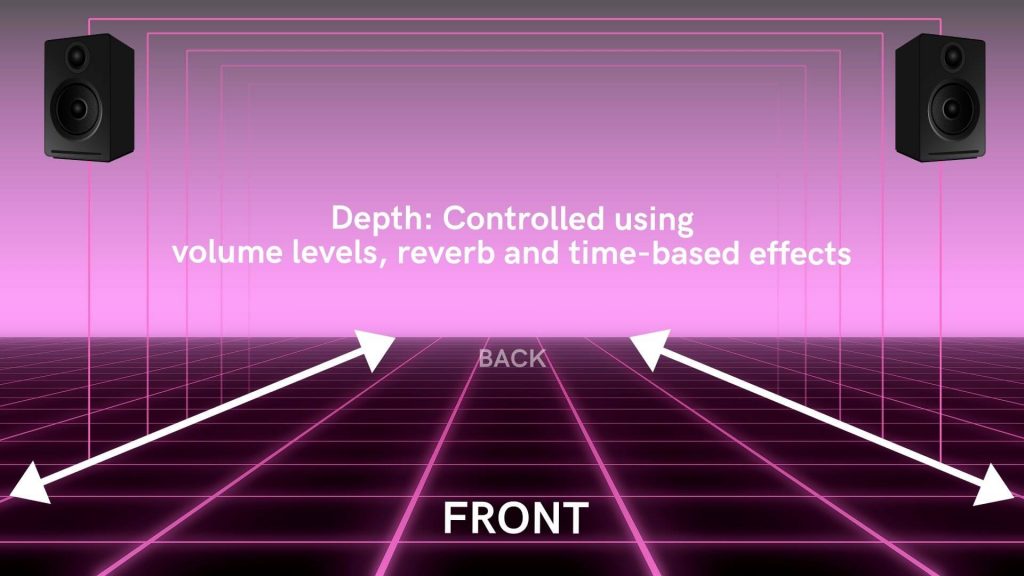
Example: Layering samples to help manage the mix depth (aka z-plane)
This technique involves layering 2 different short articulations in order to bring a sound more upfront in the mix (it also creates more attack). At first this might sound strange: “why would I want multiple versions of the same articulation? But this is where the differences between sample libraries comes to play. For example, some libraries are recorded wet (learn more about what this means in my post here) and they don’t always include the functionality to “move” the sound closer to the source (eg adjust the microphone position, aka “close mic”).
In this case, the short articulations they have provided might sound great on their own, or with a less dense productions, but, when mixed in with a busy production, their “wetness” and distance from the microphone, means that the sound will also be pushed “back” into our mix.
Dry sample to the rescue!
To help create more attack, and to move those sounds more upfront in the mix, I will layer another short articulation from a library that is recorded DRY. By balancing the two samples (one recorded wet, one recorded dry) I can better fit the notes into my overall mix.
One initial question might be “why not just use a single library that provides close mics?” And yes, this is one way to do it. I have found that most of the libraries I have used in the past that allow me to adjust mic positions, are still not as effective as using two separate libraries that were specifically recorded WET and DRY. A good example of this combo is a Spitfire library (eg Chamber Strings) and LA Scoring Strings. Even though Chamber Strings includes excellent mic placement options (including close mics), I still find that for certain types of music production, they are just not “upfront” enough. Meanwhile, LA Scoring Strings is recorded completely dry and extremely upfront (it sounds like the mic was placed right on the strings!) When I layer these two libraries together, I get the very best of both worlds and have more control over the final sound.
Example: Layering legato instrument(s) over an ensemble performance
Using ensemble patches can be a great way to quickly sketch an idea. And, often, they work fine for the final production (especially if we are on a tight timeframe to get something done!) Ensemble patches, by definition, are polyphonic which means we can play multiple notes at once (obviously, this is how we play the full ensemble!) On the flip side, however, this also means that they are not able to produce legato transitions. Which means, depending on the music, the transitions between notes and chords can be less-smooth and not as natural sounding. One way to introduce smoother transitions between notes, is to layer-in legato articulations. This can be for just the melody line (eg if that was performed on a violin), or, it could be for each instrument. Of course, at that point, you might not need the original ensemble performance as you would have recreated it as separate instruments.
Example: Layering a solo instrument over an ensemble for more intimate detail and clarity
This example is similar to the previous one, and could also fall into the orchestration or arrangement category, as, it is how to balance the sound of our instruments. Referencing our “voice” example above (where a single voice provides the most clarity, but less fullness), using a solo instrument to double instruments that we want to emphasize and/or punch out of the mix, will have a similar effect. If we have a main melody played on a large violin section, it might sound HUGE with all those players, but, it might also start to lose a little clarity when played with everything else.
So, one approach is to layer-in a solo violin playing the same notes. As with everything discussed here, I find that I really need to adjust the volume of the solo instrument so that it doesn’t overtake the full strings. This might sound weird at first: how can a single violin overtake the entire string section? This is because our ears will focus in on what is most clear (the solo instrument). Depending on volume, it’s possible the solo instrument will sound louder to us. Of course, this might be what you want for your music, so it’s hard to give a formula for this — but, just be aware and use your ears to adjust for what works.
3. SITUATION THREE: Laying Samples to Create a Unique/Original sound
Perhaps the largest challenge we face when using sample libraries for our instruments, is the fact that all of our peer composers are using the same sounds! This means, we are all using the same violin, cello, bass drum, horns, etc. Literally, it’s the same instrument played by the same player just being heard in a different piece of music. Therefore, layering samples can be more than just a way to create a richer or more detailed sound, it can also be a way to create a sound that is unique to us as composers and producers.
By layering-in different instruments from different libraries at different volumes and velocities, configurations, etc, we are making it less likely that our final sound is something that has been created somewhere else. Of course, there is a limited number of sample libraries in the world, therefore, there is a limit to these unique combinations; but, this is a great way to create a sound identity for ourselves and make our final productions sound more original.
Be creative!
While it’s difficult to give examples in this scenario, as it ultimately comes down to which libraries you have, and how you want to shape your own sound, I will say that one of the libraries that gets called out constantly is the very well-known (and well-used) percussion library, Damage by Heavyocity. This might be THE most used percussion-based library of all time and is probably in every single trailer production ever made (OK that’s an exaggeration!) Because of its unique and extremely recognizable sound, many composers will now layer several other percussion instruments on top of their Damage drums, in order to make a new and original sound.
Similarly, in the world of orchestral libraries, I might offer a similar challenge with Project Sam’s Symphobia 1. I love the unique sound of this library, but, it is also so recognizable, that I rarely use it by itself and instead will usually layer Symphobia under other string and brass instruments to act as support.
Summary
As I said at the beginning of this post, my hope was to provide you with my approach for both the how and the why of layering samples for my orchestral work. When I first started out, I would usually just layer instruments randomly, hoping that they sounded good. And, this is not always a bad approach as it can lead to magical surprises you would have not thought of! That said, I hope this post creates some structure for you to use as a starting point for crafting your own musical sounds with sample libraries. Good luck and be sure to keep in touch!