Now it’s time for Intro to Orchestral Sample Libraries, Part V: How to use Modulation and Expression. In our previous lesson, Note Length and Velocity, we just started to scratch the surface on how MIDI programming can be used to make our orchestral sample work sound more realistic. We are going to keep the conversation going by now digging into the use of two key MIDI parameters, Modulation and Expression. These are two very powerful tools that are basically “must haves” for making your sampled instruments sound more realistic and expressive.
As a quick side note: this topic requires that we use “expression” (the verb, in lowercase) side by side with the MIDI programming parameter, “Expression”, with a capital “E”. I just want to call this out to hopefully avoid some confusion while you’re reading below.
Quick Re-Cap: Velocity
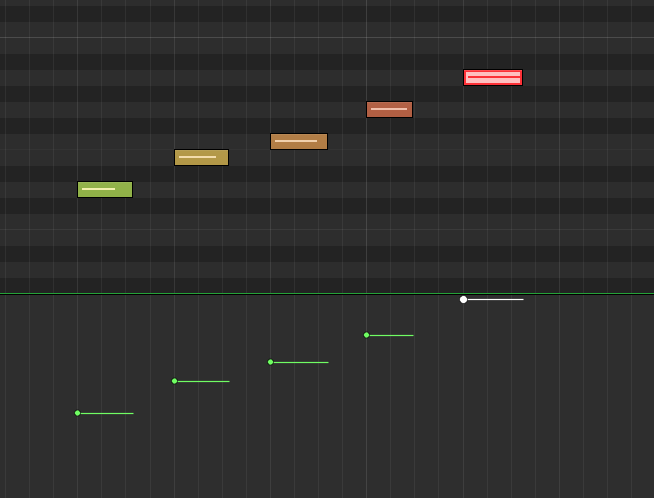
In our previous lesson, Note Length and Velocity, we talked about velocity being a measurement of how “hard” a note is being played. As a quick recap, imagine a drum that can be hit as a soft tap, and with each hit, increasing that force all the way to a full-on BANG of that same drum. In a sampled instrument, the velocity parameter gives us the ability to chose how hard EACH note is being played. This is a key distinction: velocity can control EACH note. No matter how many notes you have, you can assign a different velocity value to each one. Again, imagine a drum roll that starts soft and builds up to a loud powerful final HIT. To do this, in MIDI language, we assign velocity values from 1 to 127 (1 being the soft tap, 127 being the LOUD bang.) Below is an example of how this might look in Logic Pro X, where the use of color (green = soft velocity and the red = high velocity.)
It’s not just “louder”
Now that we’ve done a refresher on what velocity is, let’s not move too far until we first remember that the “sound” of velocity is not only about “quiet” vs “loud.” Thinking in only those terms, we might confuse it with volume: if you want the drum quieter, turn down the volume, etc. But in fact, the way an instrument is hit effects more than just volume. For example, if you hit a drum very soft, it will have a completely different timbre and texture than it does when hitting that same drum hard. So, when we talk about velocity, and it will be the same for modulation, we are not just talking about volume (although sound level does get impacted of course). Instead, we want to be aware of how these various parameter settings effect the tonal qualities of the instrument. Indeed, these wide variants are what make instruments so expressive and using them correctly is how we make our sample-based orchestral projects sound more realistic (there’s that word “expressive” — with lowercase “e”.)
As mentioned above, velocity can be set for every single note in your piece! However, it cannot change within the duration of that note. What does this mean and why is it important? In the example above, a short hit, like a drum, usually only lasts for that brief moment as the instrument is struck. Compare this to a long, sustained note performed by a string section. In this case, velocity can only impact the first “strike” of that long sustained note. However, when playing a sustained note, a string player will actually be changing their velocity throughout the duration of the sustain; in fact, this is exactly what makes instruments sound more “realistic” as it introduces more human expression. For strings in particular, many sustained notes start softer as the player begins the bowing, and then swells up to a louder velocity before coming back down as they fade or transition to the next note — all with a single note! Another way to envision this, is to imagine a crescendo/decrescendo.
Modulation to the rescue!
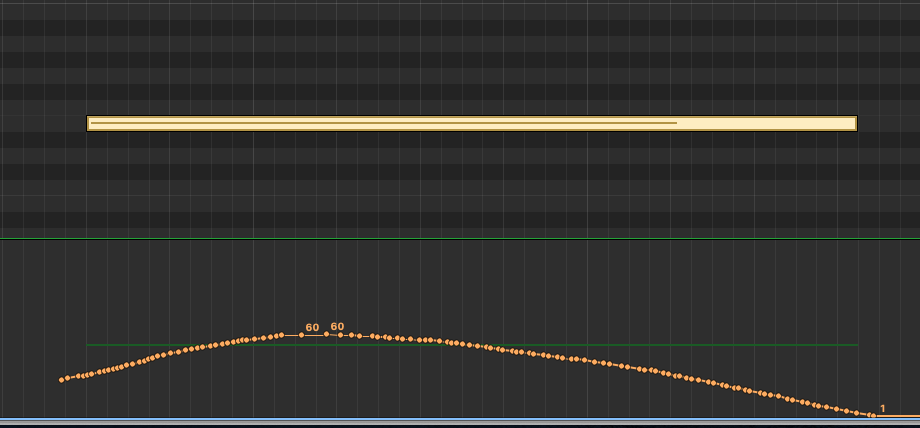
How can we accomplish the sound of these very common articulations, if we only have velocity impacting the very first hit of the note? This is where modulation comes in! Modulation can be adjusted throughout the entire duration of a note. We can start soft, swell to more force (crescendo) and then slowly fade back down to a whisper all within the span of a single note! Wow. How do we do THAT? Please refer to the screen shot below, taken from the Logic Pro X MIDI editor. On top we see a single sustained note (that yellow bar). Below the note, notice the orange dots that make up a curved line – this is the modulation for this single note. You can see that the tone starts soft and continues to rise up and then slowly fades back down. No string player would play a note of this length using the exact same velocity for the entire duration of the note. He/she would be varying the velocity as the note sustains, as in the effect shown below: creating a crescendo and then a decrescendo. This is how we breath life in to our samples!
Cool! But HOW do I do I create this modulation?
In the example above, I drew the modulation by selecting “modulation” inside of the Logic Pro X MIDI editor. Then, after I found the notes I wanted to modulate, I held down the COMMAND key, which allowed me to draw this shape into the modulation window. If you’re using another DAW, I’m sure you’ll have the same ability, but perhaps using different key commands. I knew I wanted the sound to start soft, swell up and then do a gradual fade down. So, that’s what I drew!
That’s what a physical controller is for!
Another, more natural way to do this, is to use a physical MIDI controller. Many MIDI keyboards include faders that can be mapped to the modulation parameter inside of your DAW. In fact, because the modulation parameter is so important, many MIDI keyboards have a controller that is already mapped to edit modulation. This is usually called the “mod wheel” on your keyboard and it has the universal MIDI number (aka “code”) of #1. You will often see the term “CC1” – this refers to “continuous controller #1″ which is mapped to the MIDI parameter “Modulation.” For reference, the Expression parameter, which we will discuss next, happens to be CC #11.
With a physical controller, instead of using a mouse to draw your modulation, as I just did, you can also use these faders to record a modulation performance as the notes are playing. Many composers prefer this method as it can create a more natural connection between the notes and the modulation performance as they are happening together just like playing a real instrument. Using the “mouse draw” method, it can often seem like you’re just drawing what you think it should sound like – not what you are feeling. Many composers will use MIDI controllers that have several faders which they can map to several different MIDI parameters: modulation, expression, vibrato, pan, sustain, etc; and, then they keep one hand on the controller faders, and one hand on their keyboard as they record a performance that includes real time adjustments of several parameters. This is too difficult for me. Too much multi-tasking! I prefer to get my notes entered first, without any concern for the MIDI parameters. After that, I will either enter the values using the drawing method described above, or, I will press record on my DAW and use a single controller to record adjustments as the notes play. Regardless of which method I use, I find that I always need to go into my MIDI editor and use my mouse to make fine-tuned adjustments at some point.
Modulation between two notes
Of course, the real power of modulation is that you can modulate across an entire sequence of notes, creating a true performance that breathes and has emotion and dynamics. To see how a transition between two notes might look, check out the screen shot below. This would be a legato transition as the second note overlaps the first (see my previous post on String articulations for more about legato.)
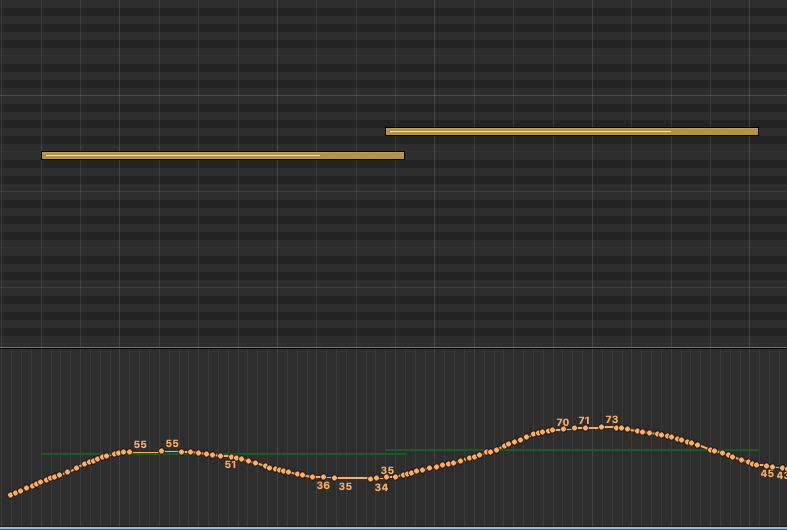
In the example above, the first note would start soft, swell up, fade down into the next note that would repeat this same “in and out” modulation. This would give the sound of a player who is fading in and out of each note. This is a good and common technique as it does recreate how a string player might approach transitioning between two notes. However, do be aware of the speed of your music in question as well as the lengths of each note. In other-words: if the transitions are too short, this type of “in and out” modulation can give too much of a pumping effect and start to sound unnatural. Like with everything we discuss in music: you need to play around with these parameters to get something you like!
Modulation for a phrase of music
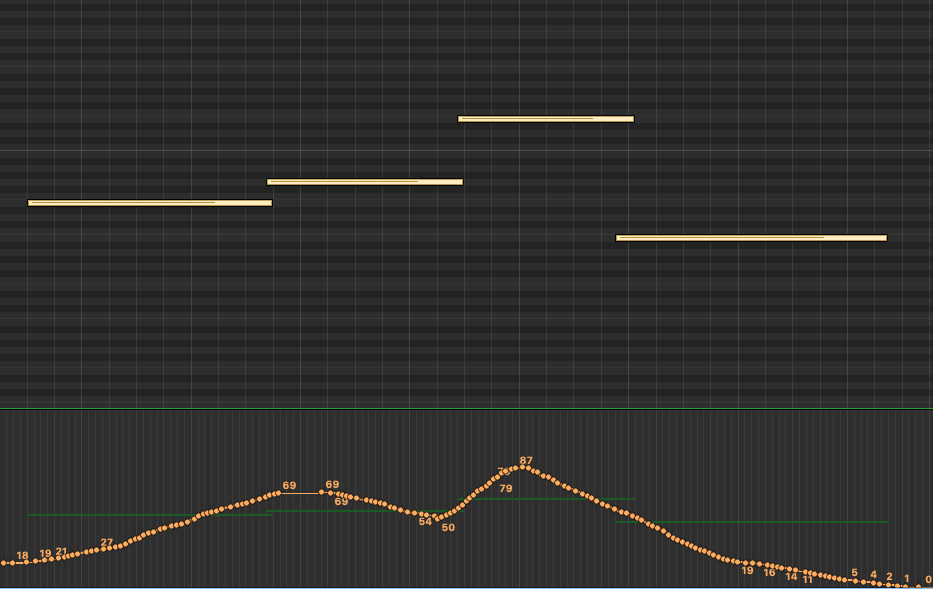
The example below is what a longer passage might look like. Here, we are allowing the modulation to develop and create a more holistic performance over time (vs from note-to-note.) Notice how it takes two notes to “swell” into the performance this time, and, just after it hits that first swell, it starts to fade down slightly before quickly swelling back into the third and highest note. After this high point, it quickly begins a slow fade down and out of the fourth note. This demonstrates one other key concept of modulation: you usually want the modulation higher on the higher note jumps, and the lower modulations on the lower notes. This is especially true in examples like what we have below, where the jumps between the second and third note is meaningful. Imagine a string player needing to transition from note 2 to note 3. That’s a 6th interval jump, so, they will likely be playing with more force, and with more speed, in order to hit that higher note; this means you want to recreate that using modulation.
But I need more Expression
I think expression is the most confusing of all parameters. Partly because it’s name, expression, has so much meaning to us as musicians. We want all our music to be expressive; so, shouldn’t we just crank up that “Expression” parameter? Why would I ever want zero expression? Well, this is where the naming choice of “expression” might not have been the best (IMO). In MIDI terms, Expression (aka MIDI CC# 11) is used as another tool to control volume. There is a separate volume parameter (MIDI CC# 07) which acts as the overall master volume for the instrument. Then, within a MIDI performance, we use Expression (MIDI CC# 11) to adjust volume, creating ups (crescendos) and downs (decrescendos) as the music is played. This ability to control the dynamics of a performance is probably where the name expression came from. Without the Expression parameter, we’d need to use the master volume control to create these detailed volume adjustments. Then, when we needed to control the overall volume, we’d be stuck going back and adjusting all those changes we made to the master volume. Having 2 volume parameters, Expression (MIDI CC# 11) and (MIDI CC# 07), we can now use one of those (Expression) to control the volume within the master volume.
Wait…isn’t expression also kind of like modulation then?
You might be thinking “but doesn’t modulation also adjust volume — allowing us to create ups (crescendos) and downs (decrescendos) as the music is played? How many tools do we need for the same thing? Well, remember, modulation is more than volume: it is controlling the velocity of how the instrument is played; and this, changes the timbre of the instrument, not just the volume. Similar to the velocity parameter, when you are adjusting modulation, you are telling the sample library to swap out the actual samples that were recorded at each of those different velocities in order to truly create HOW that instrument should be played. Expression and Volume are only turning the volume up or down – the timbre and tone of the instrument stays the same.
How to use Modulation and Expression together?
I have found that my Expression values often follow my Modulation settings, and I usually start off by defining the modulation first. Remember, as MIDI programmers here, we are trying to recreate how a player would play their instrument. Modulation does impact the volume of the sound, but, as mentioned above, it does this by selecting the right sample for the velocity at any given time. Sometimes, this doesn’t always give you the dynamics you’re after. Sometimes, for example, you want to use the lower velocity samples, but, you also want the sound to be quieter and even fade out completely (as a real player would be able to do.) Modulation will not fade the sound to silent, it will only serve up the softest possible sample available. This is where Expression comes in. Expression can help make the performance even more dynamic, by allowing you to adjust the volume in such detail.
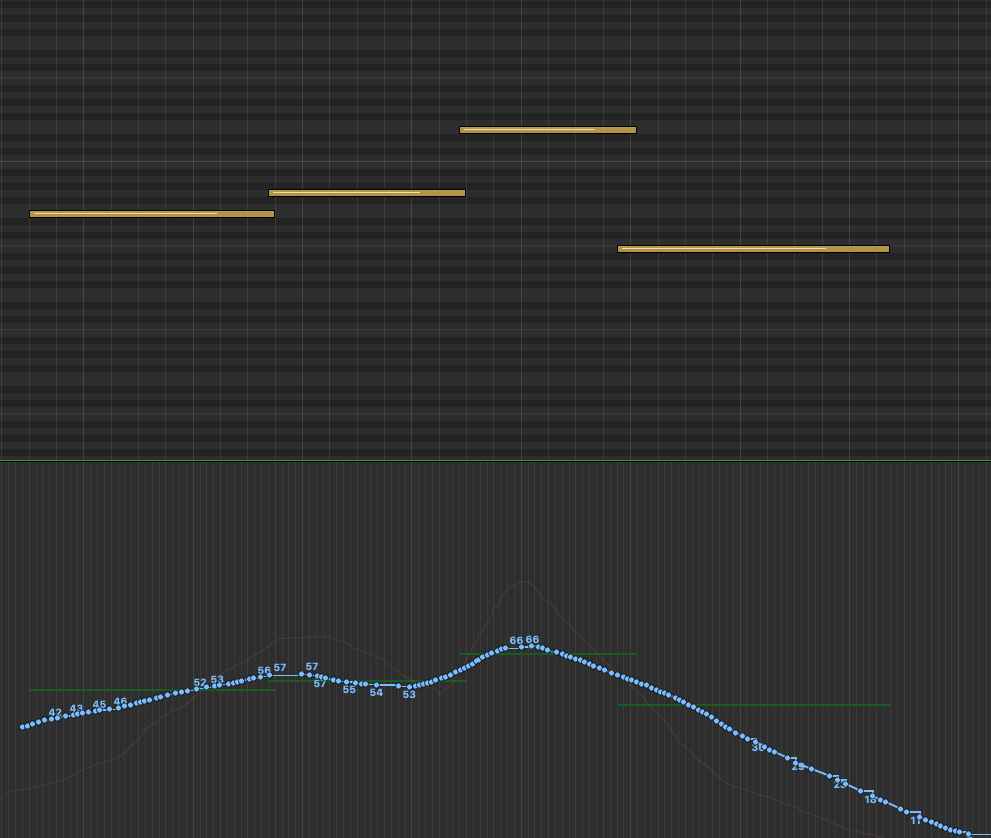
Refresh your memory by taking a quick look back up at the very last screen shot of those four note performance. Below is what the Expression for that might look like (in the blue lines). If you look closely, you can see the orange Modulation lines in the background. Notice how the blue Expression line follows the Modulation we did before, supporting the same musical flow and emphasis to provide additional dynamics to this performance. It does not have the same level of swings (up or down) as that would be like turning the volume up and down too much! So, we usually try to be more gentle with Expression. And, as a reminder, with Expression, that final fade down on the fourth note, will actually make the sound go silent (as Expression acts just like volume.)
Summary
I hope you can start to see how to use Modulation and Expression for making sampled orchestras sound more realistic. Think of these tools, as well as the other MIDI parameters that are available to us, as ways to “perform” your samples. This is key: to get more realistic sounding orchestral samples, you have to think like a performer, not a producers or a programmer. Of course, this does require having some understanding of how an instrument is played. So to this, consider spending time researching more about the instruments and how they are played. And, even better, if you have friends, classmates, or access to music schools where orchestra members hang out…introduce yourself and ask if you can ask them about their instrument. You’d be surprised how open musicians are and how much they want to talk about their passion. (Sound familiar? )So yes, you can really fine tune a realistic-sounding orchestral performance, that recreates how a player would approach their playing; it just takes time to tweak all these parameters!
Don’t forget to check out the previous post orchestral string articulations as well as the rest of this series on Intro to Sample Libraries for more lessons on creating realistic orchestral programming!
Watch the video: How to use Modulation and Expression!
Thank you for this article – it was incredibly clear and so helpful!
Nice Tutorial. I compare Modulation and expression as follows; If someone whispers on the radio and you increase the volume, the voice will not start shouting but will still whisper, just whisper louder.
I’m going to read through all of this.
Thanks
Thanks Frank. That is a great way to describe Modulation. Love it!